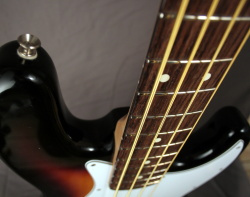
I just refretted my Fender Jazz Bass (sponsored link to Thomann, where I bought it) and documented the process, in case somebody else out there is also thinking about doing it.
It might initially seem like an impossible task, but if you research the subject (there are loads of stuff on the internet about refretting) and practice on disposable guitar necks before moving on, it really isn't.
A few years ago I was diagnosed with nickel allergy and eliminated everything too rich in nickel from my diet. My skin got a lot better, but my skin problem didn't go away on my hands and legs. It wasn't until I saw a television show, where people were getting eczema on their chins from contact with the mouthpiece of their mobile phones that the nickel finally dropped! I tested both the strings and frets of my guitar and bass, which confirmed my suspicion: They were full of nickel. I know, they're called “nickel-wound” strings for a reason, I just never thought they could have such an effect.
To confirm the problem really was the instruments, I stopped playing guitar and bass for a few days and noticed a huge improvement on both hands and legs. I realized I had to refret my instruments, or stop playing, which really wasn't an option.
Since I didn't have the money to send them to a professional luthier I decided to do it myself. It took a lot of research before I thought I could actually do it. But thanks to some great fretting enthusiasts out there, with the right DIY mentality, I was convinced to go ahead with the project.
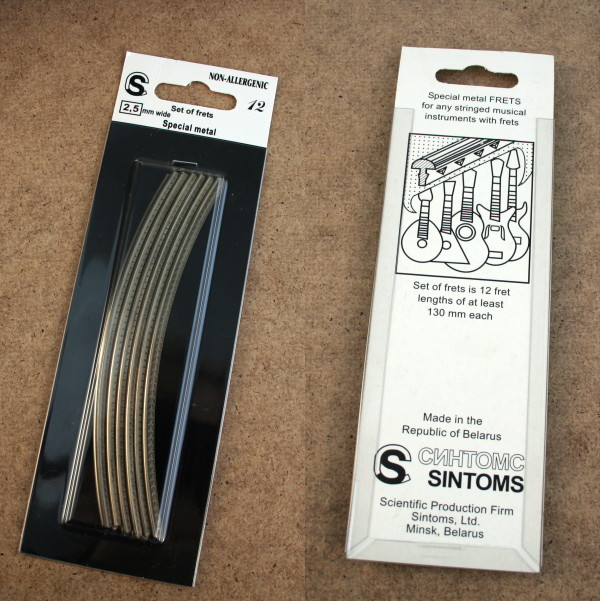
I found some special anti-allergic frets from the Republic of Belarus and ordered them from Peter Schneyder's Music Shop in Germany. I decided to avoid buying specialized fretting tools, to both keep expenses down and avoid waiting for them to arrive. I in stead tried to make them myself, by customizing tools and improvise. You can see them here: Tools for refretting an electric bass or guitar.
I started out practising refretting on an old trashy guitar, proceeded on to my favorite guitar and finally refretted my Fender Jazz Bass. I decided to document the process, just in case there are more people out there who are thinking about refretting their instrument themselves, but find the idea overwhelming. I certainly did, but if you read through the many ressources on the internet, get an old guitar neck or two and practice on them, you will probably feel proficient enough to move on to a “real” instrument before long. I will include some links to the people who I learned how to refret through at the bottom of the page.
Enough talk, let's refret!
Straightening the neck
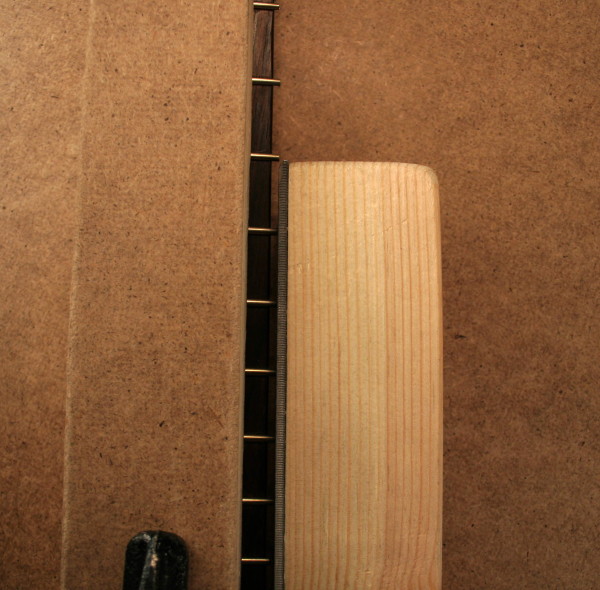
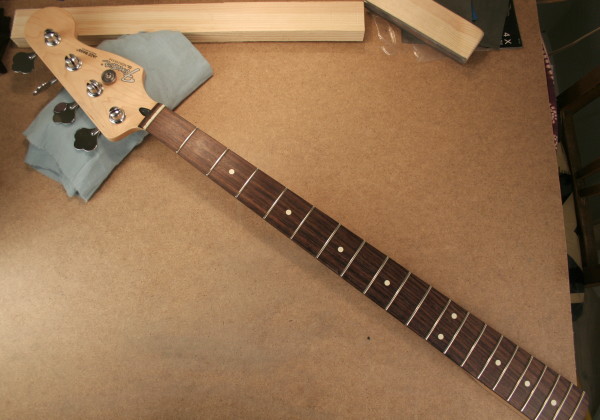
First, I remove the the bolt-on neck from the body, which makes it easier to handle. You can't really see it in this picture, but the neck is concave, bending slightly upwards.
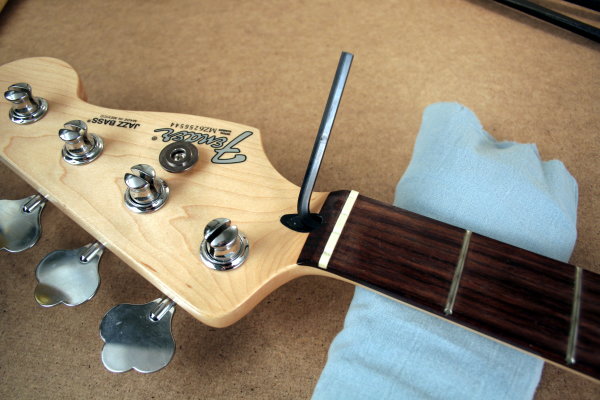
To straighten the neck, I turn the truss rod with an Allen socket wrench. 2 quarter clockwise turns straightens this bass neck. The bass fortunately comes with an Allen socket wrench, because my Danish Allen socket wrench which is measured in units of millimeters doesn't seem to fit. The Fender Allen wrench does seem to be very close to 5 mm.
With a scraper or something straight like a metal ruler, I check that the neck is absolutely flat and doesn't curve in either direction. I repeat this when all the frets are removed.
Removing the frets
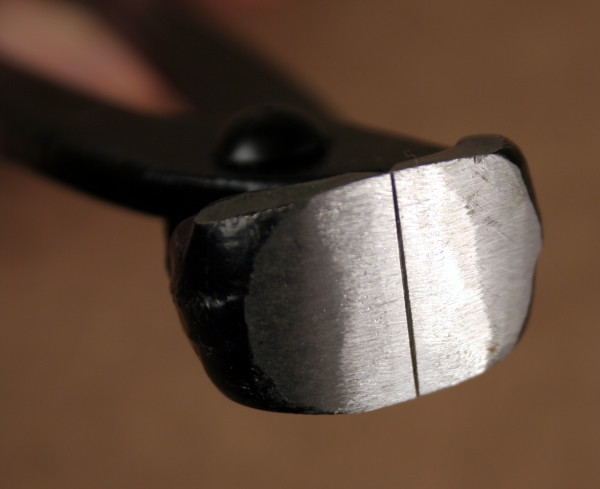
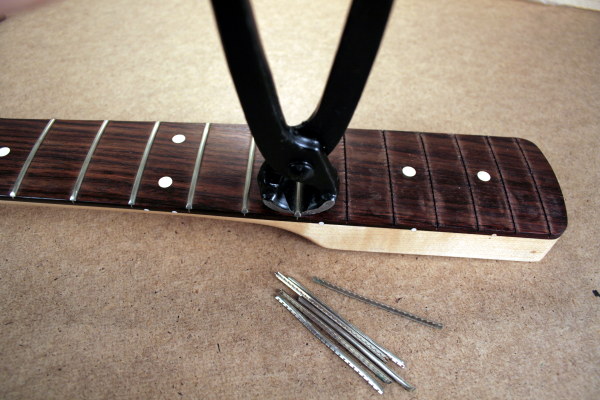
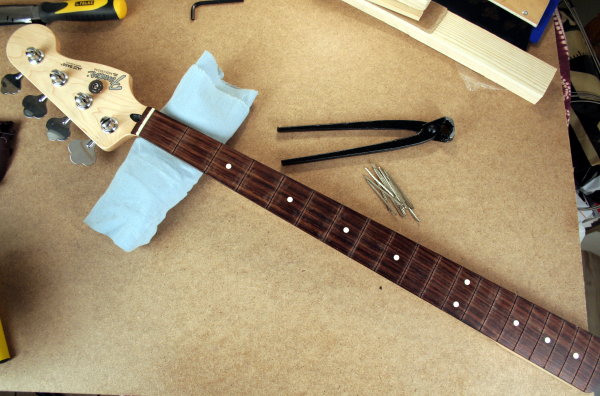
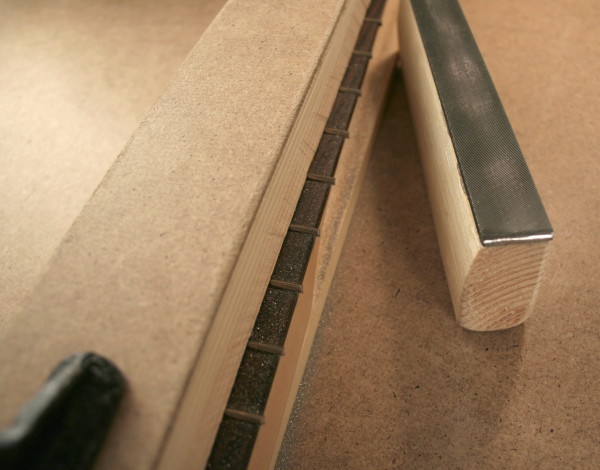
I remove the old frets using a pair of tower pincers turned into a fret pulling tool.
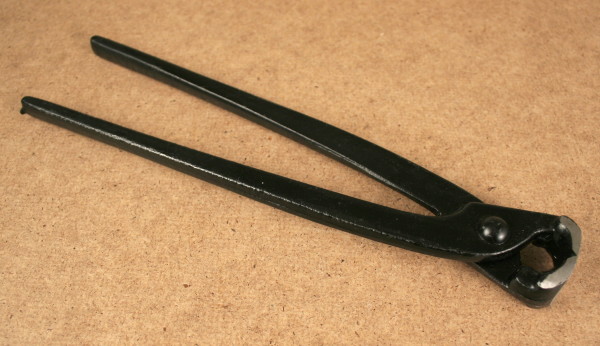
The jaws need to have a little work done before I can get close enough to the frets. I remove excess metal by grinding down the jaws until they are sharp with a double cut file.
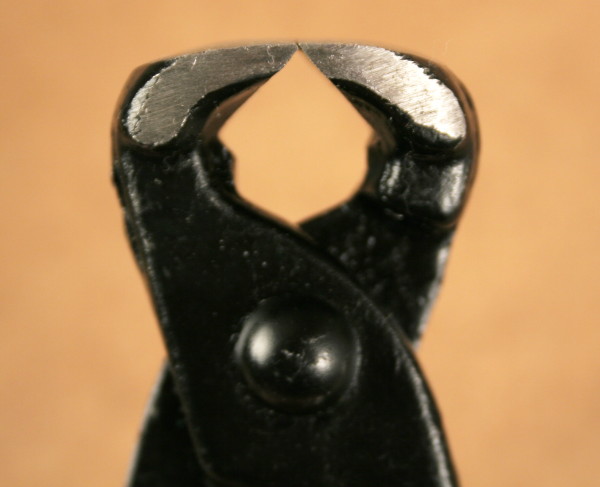
The flush-ground jaws are wider than a professional fret puller, but they get the job done.
Many fretting tutorials recommend warming up the fret with a soldering iron. The rationale for heating the frets is that it lubricates the path of the fret, making it easier to avoid chipping. It didn't seem necessary for neither this bass, nor the two other guitars I practiced on. Probably because where I live the climate is very humid, which prevents the fretboard from becoming dry and brittle.
I start with the pincers at the end of the fret, and gently rock the handle, letting the fret work its way upward by itself, moving towards the center.
Fixing chipping
Some chipping is almost bound to happen.
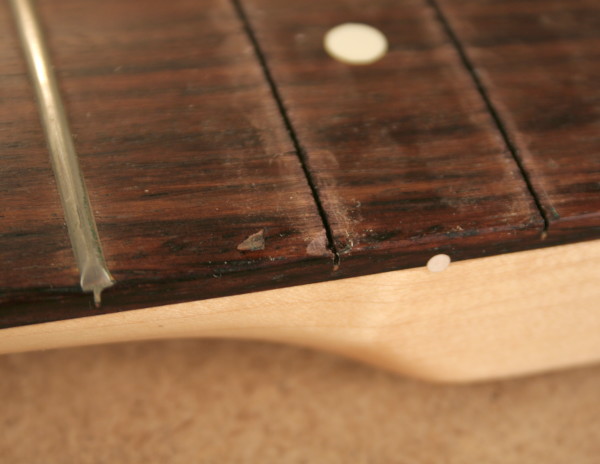
I put back the chip with a little cyanoacrylate instant glue. After all the sanding and polishing is done, it will be virtually impossible to spot.
The rocking of the tower pincers left some marks on the fretboard. They did go away in the end, but next time I will probably try to get hold of something that resembles a real fret pulling tool a bit more. The tower pincers are too rough for this job!
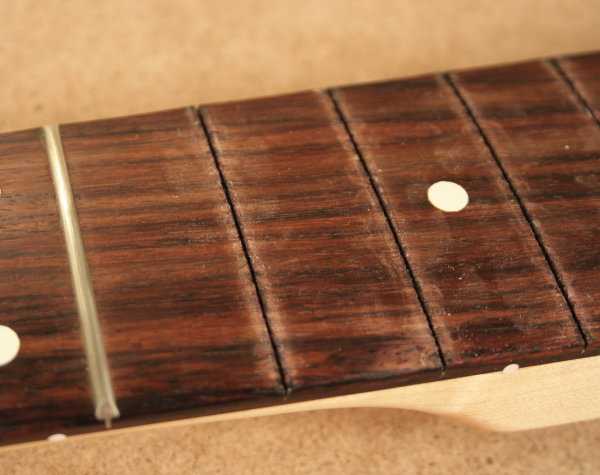
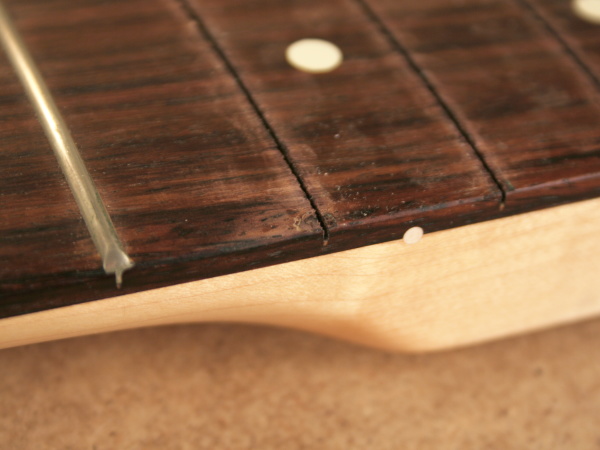
All the frets are off, luckily without any serious chipping. When all the frets are off, remember to check if the neck is absolutely straight, this is actually a better time than when the frets are still in. I also clean up the fretboard with some lukewarm water and a cloth at this point, taking care that loose chips stay in the fretboard.
Since the bass is fairly new and hasn't been used a lot, there is no need to level or sand the fretboard.
Hammering in the frets
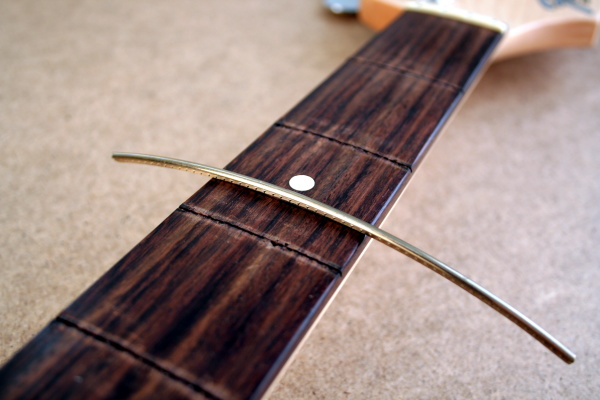
The frets are overbent, exceeding the radius of the fretboard, which ensures they're tight down at the edges. These are quite wide (crown width 2,49mm, crown height 1,19mm, fret height 2,8mm, tang width 0,5mm) but just to make sure they fit well, I bend a fret and hammer it in. This also tests whether the fret tang is too tall in which case the the slots might need to be deepened with a slot-cutting file. To clean the fret slots I use a small scraper which I gave a few “teeth” with a small file and used that in stead of a slot-cutting file.
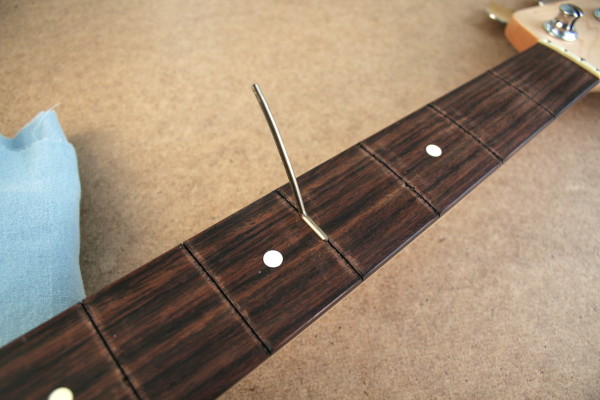
By lifting the neck with the fret wire, without it dropping out, it will probably fit tightly and not jump out over time.
I ordered pre-bent anti-allergic fret wire from Peter Schneyder's Music Shop in Germany, they are produced in Republic of Belarus. The anti-allergic fret wire falls between stainless steel and contemporary nickel silver, in terms of hardness.
I prefer pre-bent fret wire, which I didn't use for my first two guitars. Bending it by hand will never give the same smoothness as having it done by a machine.
Luckily this bass doesn't have bound fingerboards, so I don't have to cut each fret tang to match the width of the fret slot. My second refret job (a guitar) initially had bound fingerboards, but I decided to just remove the binding (some kind of dark lacquer) with my scraper turned into a slot-cutting file, mentioned above.
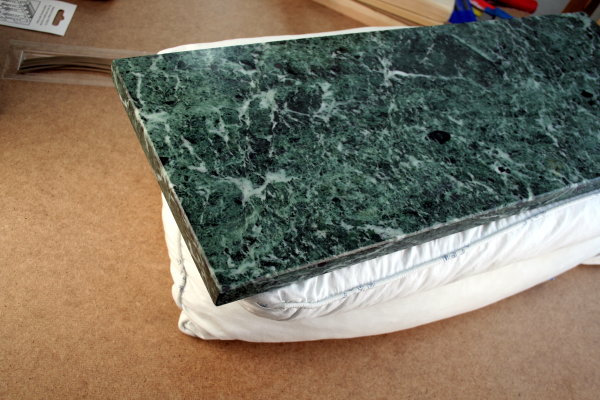
Time to hammer in the frets: Since I am not working at a work bench, but a flimsy table, I make a shock absorbing construction by putting a slab of marble on top of a pillow, which absorbs the blows very well. I put some cloth under the guitar neck where the fret I am hammering in is positioned, for support, while I hold the head of the guitar with my left hand.
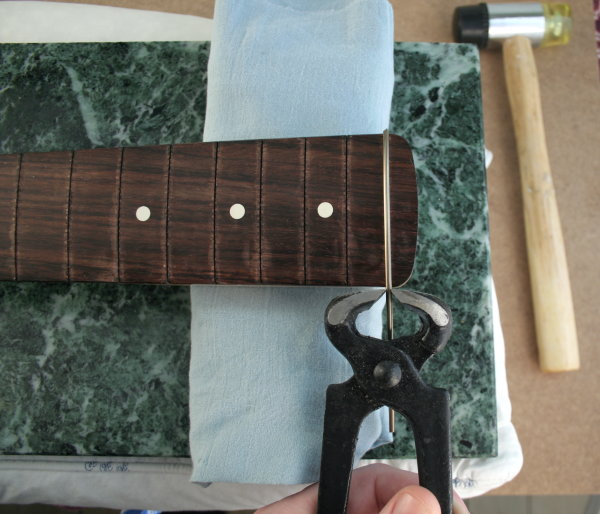
I clip the frets to the right size with a pair of carpenter's pincers. I don't try to get as close to the fret board as possible, since excess fret will be ground away anyway with a double cut file. I cut all 21 frets to length and put them on another table, ready to be hammered in.
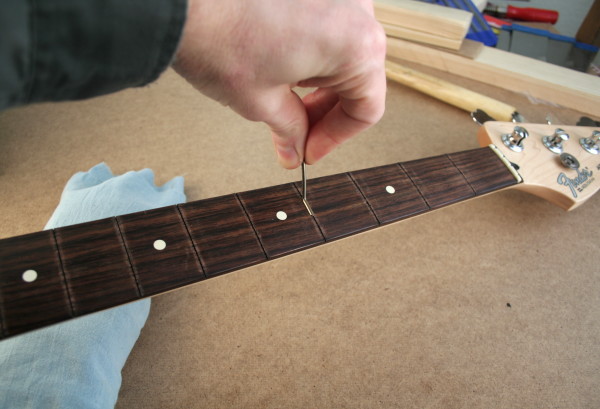
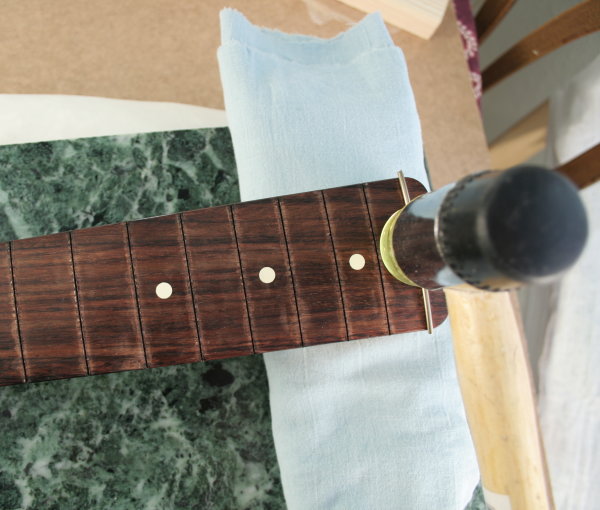
I start out by gently tapping in the ends of the fret and hammer in the fret with 20-30 quick taps, keeping the plastic hammer parallel to the fretboard. I use short, sharp blows to seat the frets, moving the hammer back and forth, making sure I hit the fret all over. You can sort of feel and hear it when the fret is seated securely.
When all the frets are in, I look down the length of the neck to see if some frets are sticking up, in need of a few more taps. I point the guitar neck towards a lamp to reflect the light in the frets.
Beveling the frets
I secure the neck with a clamp, putting some wood between the clamp and the fret board.
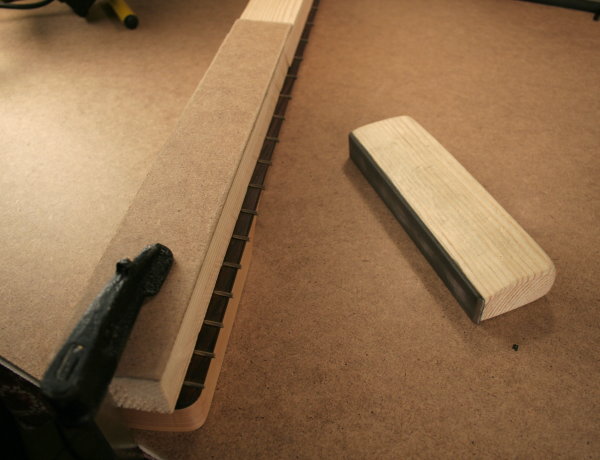
Time to bevel the frets with my custom fret beveling file. I bought a standard single cut file, cut off the handle, rounded the edges and glued it to a piece of wood.
To lift the neck a bit I put an extra piece of wood under it. I like to keep as much fret as possible, to avoid over beveling the fret ends. If too much fret is removed, it causes the string to roll off the frets when playing, so I keep the file at 90 degrees to the surface of the fingerboard. I file until the fret metal is gone and the file starts touching the wood. Don't worry, these file marks will disappear during the process or can be polished away with either very fine sand paper or steel wool.
Dressing the frets
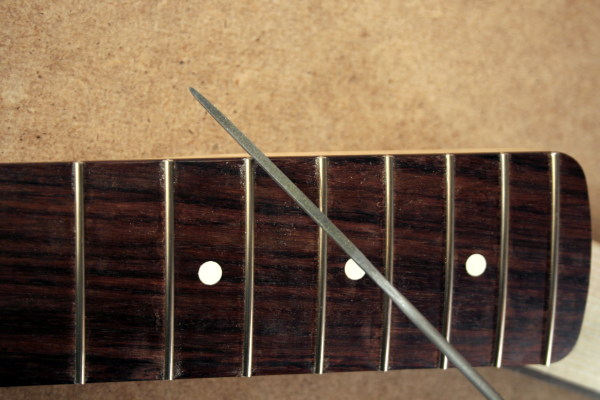
Rounding the ends of the frets with my customized fret end dressing file. I took a small four-sided file and ground one of the sides flat. I keep the flat side toward the fret board which prevents it from damaging the fret board when I dress the fret ends.
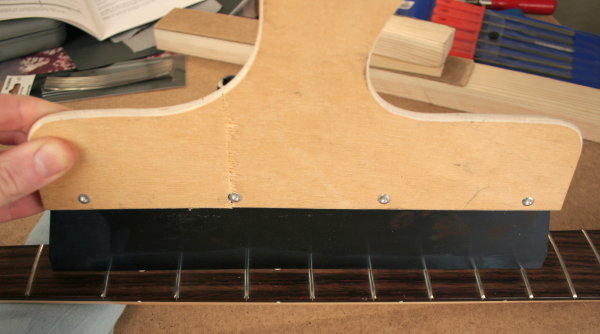
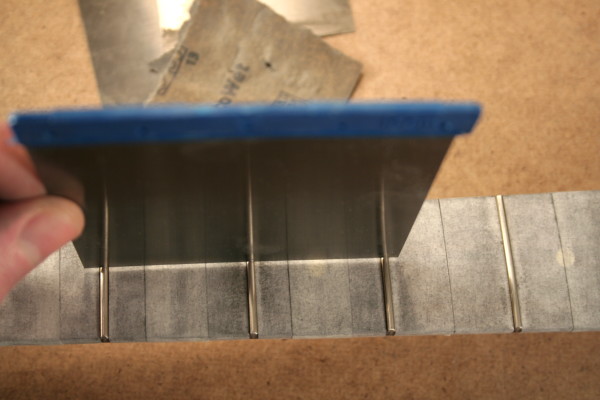
Levelling the frets
With a sanding block and some 320 grit sand paper I level the frets. In my earlier practice runs on my two guitars, I used a black marker to draw on top of the frets. But this time I just sand until I can see that all the frets have been touched. With black marker on them, you can see if all the frets have been leveled.
I try to keep the sand paper tight around the sanding block.
Finished planing the frets, you can just sense that the frets are slightly flattened. This will be corrected with sand paper during the rounding over process.
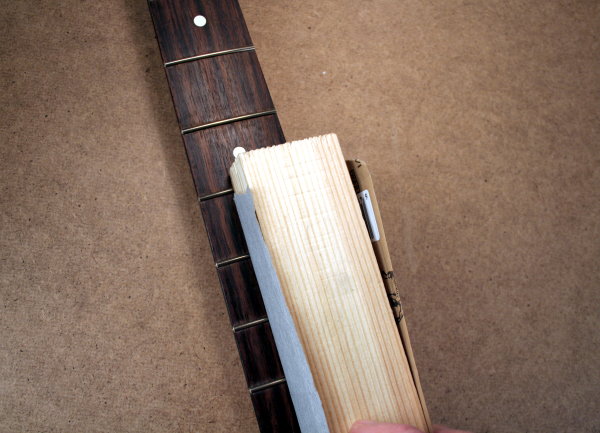
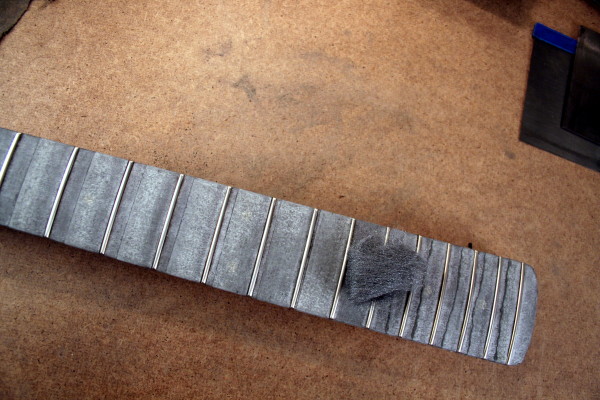
Sanding the frets
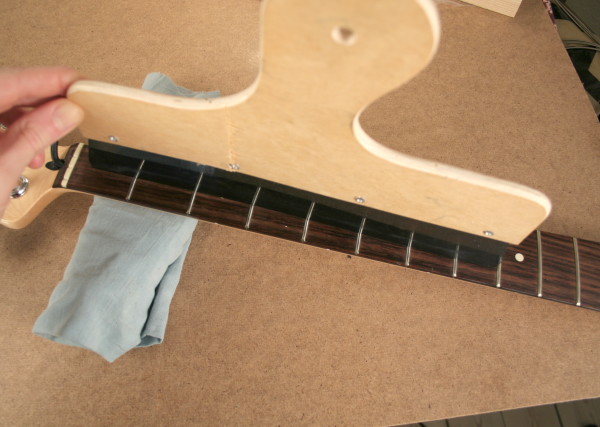
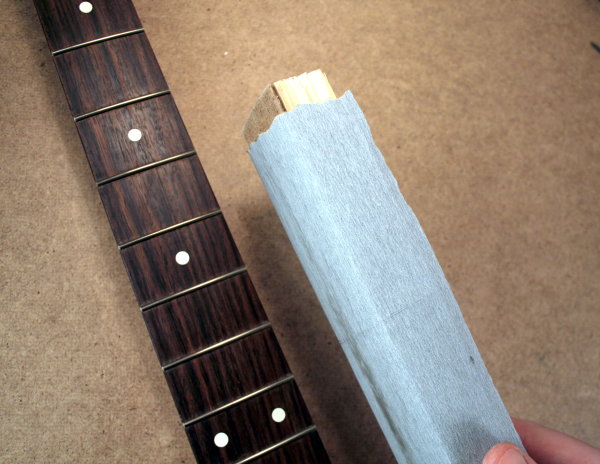
I tape up the fret board with masking tape, to avoid scratching it during the final sanding process. Using three small scrapers of varying width, moving from the head towards the body, I locate the frets that are too high by comparing them three frets a time. If the scraper rocks to either side I sand the middle fret with sand paper wrapped around my fingers, until the scraper doesn't rock any more.
Starting with 320 grit, I sand the frets, rounding their surfaces, going through the following sandpaper grits: 320, 600, 1200 and finally 00000 steel wool, which really makes the frets shine.
Cleaning the guitar neck
Job almost done, time to wipe the neck clean with some naphtha on a cloth. Some recommend finishing with some mineral oil, but I don't feel it is necessary.
I turn the truss rod 2 1/4 anticlockwise turns to bring back the original curve.
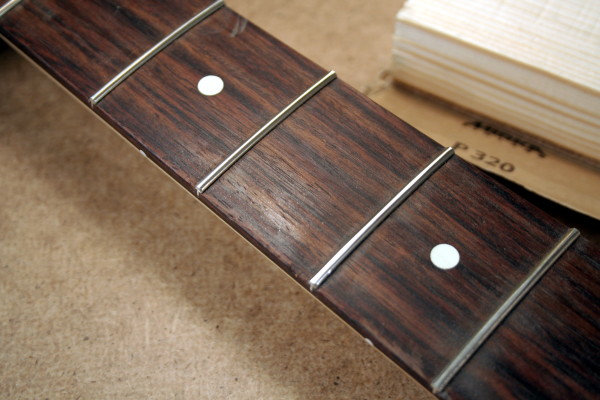
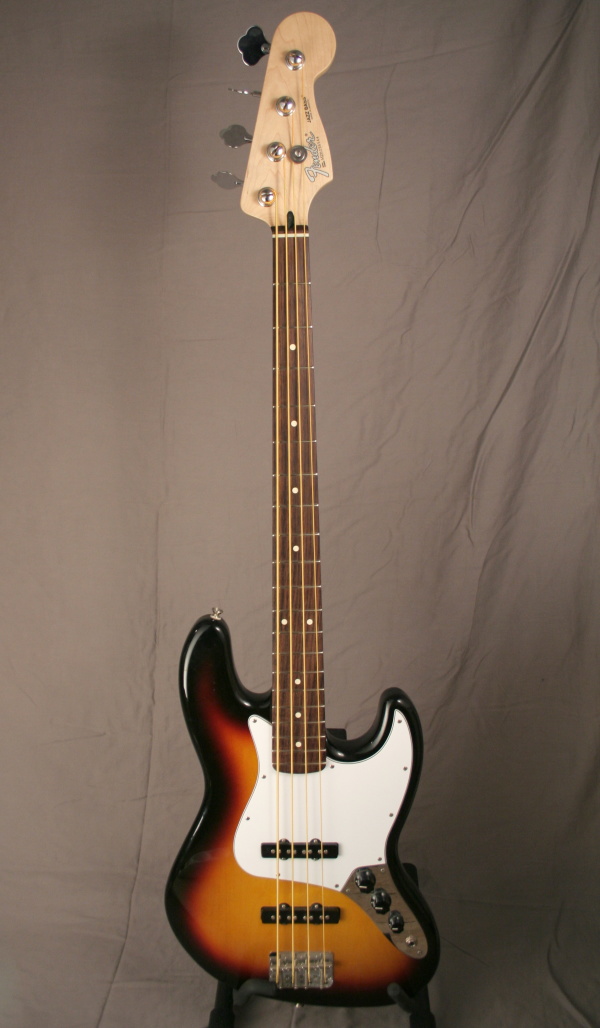
The finished, refretted bass
With anti-allergic fret wires and gold strings, which don't cost more than standard nickel-wound strings.
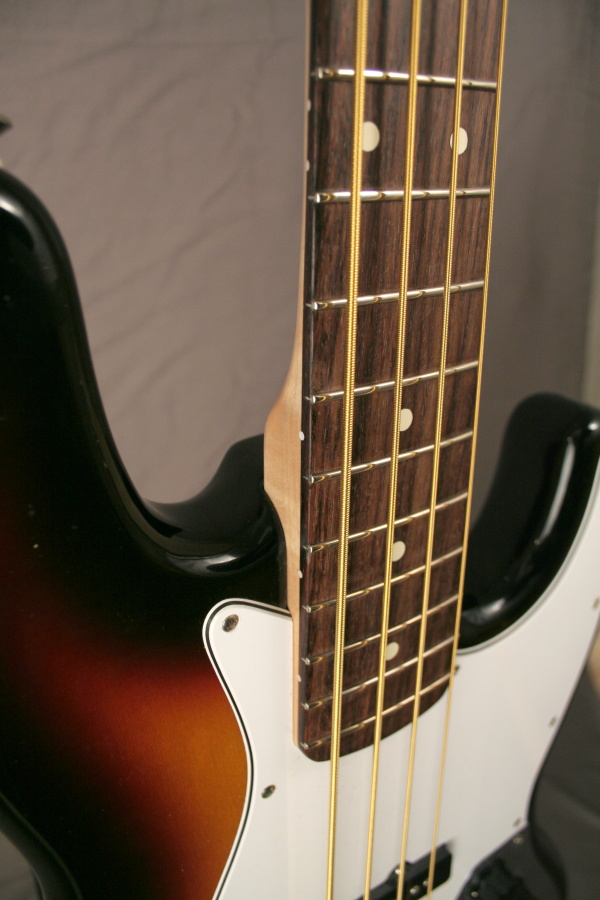
Shiny frets.
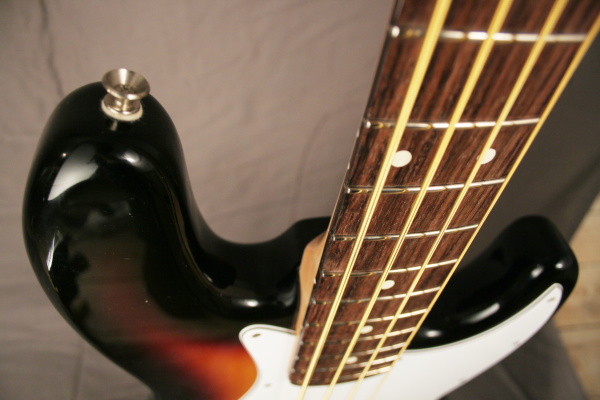
Notice the “missing” bevel.
More refretting information:
- Anti-allergic fret wires
- frets.com by Frank Ford -- the number one fretting ressource
- Video about dressing fret ends
- Finger Lakes Guitar Repair -- lots of refretting examples and related guitar issues
Great directions and photos!
Great directions and photos! I might give it a shot.
great tutorial!
Hey men, thanks so much for this great info! you make it sound so simple though..lol ill give it a try and let you know
Very well done. Thank you!
Very well done. Thank you!
refretting a fender jazz bass
thanks a bunch for putting this up.very concise,great pictures,i cant say more,thanks
Great work mate! Looks nice!
Great work mate! Looks nice! :)
anti allergic frets
Hey man - i have just found out i have the same damn thing, nickel allergy. Are those frets silver or gold coloured. I checked the site but it's in german. i would like to contact them about pricing, size, ect. does anyone there speak english. I play guitar a would like something in a jumbo size and silver. i know jescar makes an anti allergy fret but it is gold coloured, not crazy about that but will use it if i must
Re: anti allergic frets
Hi James - Nickel allergy sucks... But new anti-allergic frets and gold strings helps a lot! I would say the frets are sort of bronze colored, or "dull gold" colored. Write Peter an email, he's real friendly and helpful and speaks English. You can find his email on this page: http://shop.strato.de/epages/15455156.sf/de_DE/?ObjectPath=/Shops/154551...
Good luck!
Thanks !
Hey man - Thanks a million, you just saved my guitar playing ways. I was gonna go crazy having to wait awhile to pay for a fret job. I'm fairly handy, do my own setups, ect., so i think i'll be able to swing this ! How are the the gold strings, sound good, play good, no allergy probs ? Again thanks a million !
Gold strings
You're welcome! The gold strings are great, sound wise I can't tell the difference from strings with nickel. I am not changing strings every two weeks though, so maybe I am not the right person to ask.
The allergy is much better, but not entirely gone... But it probably isn't from the strings or frets, since the improvement after getting rid of nickel strings and frets was huge.
These are the strings I am using:
Electric Bass: http://www.thomann.de/gb/optima_2319.htm
Electric Guitar: http://www.thomann.de/gb/maxima_2028el.htm
question about removing frets
I have picked up a lot from your article about how to put the new frets on my bass, but my problem is how to get the old ones off, the bass I've got is an older (mid 70s) Jazz that I just picked up. The old owner told me that he got it some years ago from a friend of his fathers and it's in great shape BUT his fathers friend had decided that he wanted a fretless one, so he methodically filed down each fret until it was smooth with the surface of the neck (Maple, if it makes a difference, I've been told that this will make it a little less prone to chipping) and then applied a clear coat over the fingerboard. The remaining frets are still as wide as they were originally (except for the one at the body joint which was filed a little more and only the thin part that fits into the groove is visible) this neck is bound and has yellowed nicely over the years so I'd hate to pull up the fretboard and replace it (not to mention the cost of doing that) If you have any suggestions as to how to get these old frets out without destroying the neck, I'd love to hear them, thanks, Paul M.
Removing fretless frets
Hi Paul, I am glad to hear you got yourself a fine bass, congratulations. I am sorry to say that I don't know how to get the old frets (without tops) out. Even when you do have the ends to pull, getting the frets out is not easy... This is a wild shot, but perhaps very precisely file away the coating over the frets, warm the frets up while hammering some kind of thin piece of metal in beneath, to push them up? But it probably wouldn't work. Perhaps, if you can get the wide ones out, do that, and just leave the frets at the body joint as they are, and keep that part fretless?
Good luck, Ras
Help! Please!
I am building a bass, and i want to know, the frets that you put in, are they still "sharp"? I mean that no matter how much I file mine, it seems that they still stab my fingers when i slide my hand on them. Do you have any suggestions?
Sharp frets
When you beveled the frets, did you file until the file started to touch the wood? Or perhaps you need to dress the frets a bit more?
How do I remove frets from a yamaha BB350F Bass guitar neck?
I am not sure that yamaha really made a fretless bass, however this is the way it was when I purchased it. I think that the frets were installed and then filed or sanded to leave only the wire in the fret groove. This looks good and is some help when playing in some light. However I want to install some frets on it and don"t know how to get the small wire out. Thanks a million for any help that you can provide.
_._
Hi Wayne, Congratulations on your new bass. It seems like that's the way it was produced, fretless, but with inlays "It came from the factory (I believe) with inlays where the frets would have been were it fretted" http://www.harmonycentral.com/products/86751
I am not sure if the inlays are even frets, or what they are made of, so I can't help you, sorry.