Setting up a Linux installation can be done in many different ways, but preserving your settings and bookmarks is nice, so you don't have to redo them after a re-installation. This set-up uses another partition (in the example, called "documents") to store your photos, documents, settings for installed programs and your mail program, and connecting to them via symlinks. This way you can re-install Ubuntu and be up and running fairly fast. First part of the process is moving the settings folder, like ~/.mozilla to another partition, and then symlinking to it from your default /home/user_name directory.
NOTE: This guide assumes some knowledge of how Linux works, creating partitions, etc. Also, always keep a back up of your files.
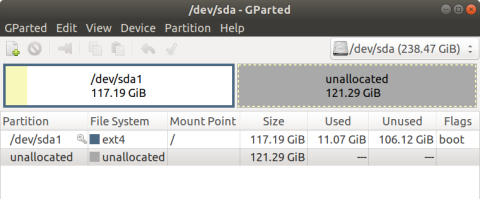
Start the installation and proceed as usual, see this guide https://help.ubuntu.com/community/GraphicalInstall. When you get to the "Installation type", you want to manually set up your partitioning scheme, so select the "Something else" option. from Ubuntu 17.04 a swap file inside Ubuntu system is used, in stead of requiring a partition. So a single ext4 partition is all that's needed:
If you get an error about UEFI, you basically need to create a 500 MB FAT32 partition with mount point /boot/efi and run the installer again.
If your documents-partition is on its own separate harddrive, it is a good idea to disconnect it while installing Ubuntu. Otherwise you might run into a problem where the system will not boot, and possibly show this Grub error a few seconds into the boot process:
Error: unknown filesystem.
grub rescue>
Install programs
After installation is complete and you have restarted the computer, the first thing to do after installing Ubuntu 18.04 is to install and activate a firewall, like Gufw.
sudo apt install gufw ufw
Open Gufw and activate it.
Now it's time to put some programs on your computer, these are a few programs for Ubuntu 18.04.
sudo apt install alacarte arandr asunder audacious audacity autokey-gtk baobab chrome-gnome-shell chromium-browser colortail curl dconf-editor dfc dia easytag epiphany-browser ffmpeg filezilla flac fslint geany geeqie gimp gimp-ufraw git gnome-tweaks gparted gprename grsync gthumb htop icdiff imagemagick inkscape key-mon kshisen lame lm-sensors lnav lynx meld ncdu nemo p7zip-full pdfshuffler psensor qpdfview regexxer scribus shotwell shutter soundconverter sox transmission tree unrar unzip usbview vim vlc wget zip
Fix shutter edit function
# Note: Might only work with Ubuntu 20.04 and newer
sudo add-apt-repository ppa:shutter/ppa
sudo apt-get update
sudo apt install shutter
Allow playing all DVDs in VLC (follow the instructions)
sudo apt install libdvd-pkg
Remove snap
To completely remove Snap and its configuration, for example to avoid reoccurring /home/username/Snap folders, uninstall and reinstall the packages the classic way:
sudo apt purge snapd
sudo apt-get update
sudo apt-get install gnome-calculator gnome-characters gnome-logs gnome-system-monitor
gnome-system-monitor and df -h is now less cluttered.
Remove Amazon
sudo apt-get remove ubuntu-web-launchers
Name and mount partition on boot
For Ubuntu to automatically register the "documents"-partition on boot, you have to add it to the /etc/fstab file. First, find the unique uuid with this command, in this example the documents-partition is on /dev/sda4:
ls -l /dev/disk/by-uuid/
sudo vi /etc/fstab
Add something like this to the /etc/fstab file, to mount it during boot:
# partition was on /dev/sda4 during installation
UUID=cb13a23c-14f7-4d40-bc5e-73a1b655e748 /documents          ext4    defaults        0       0
Chown the partition with your user name and check it works - of course, don't actually use "your_username" :-)
sudo chown your_username:your_username /documents/
ls -al /documents/
Clean up, remove extra folders in home directory
Note the space in front of the command, which prevents it from getting saved to terminal history.
rm Documents/ Downloads/ examples.desktop Music/ Pictures/ Public/ Templates/ Videos/ -rf
Set Nemo to be default file program and check it works
Nemo has more options than the default bare bone file manager in Ubuntu:
xdg-mime default nemo.desktop inode/directory application/x-gnome-saved-search
xdg-open $HOME
Ungroup windows using Alt+Tab
Set Switch Windows to Alt+Tab under Settings > Keyboard > Navigation.
Add and install jumpapp
Jumpapp binds a key for any given application that will launch the application, if it's not already running, or focus the application's window, if it is running.
https://munix.dk/custom-shortcuts-jumpapp-ubuntu-1604
Disable default <Super>P: https://askubuntu.com/questions/68463/how-to-disable-global-super-p-shortcut/1038869#1038869
Open dconf-editor, and change shortcut <Super>P to fx <Ctrl><Super>P:
/org/gnome/mutter/keybindings/switch-monitor
/org/gnome/settings-daemon/plugins/media-keys/video-out
Symlink setting folders from home to /documents partition
After installation, create the symbolic links from the home-partition to your home-folders on the "documents"-partition, /documents/.documents_home. Rename the newly generated setting folders, fx for Firefox from ~/.mozilla to ~/.mozilla-DELETE_ME, and delete mozilla-DELETE_ME when you are sure it all works. The command cd ~ will change directory, to your home folder, /home/YOUR_USERNAME.
cd ~
# NOTE: Close Firefox before running these commands
mv ~/.mozilla ~/.mozilla-DELETE_ME
ln -s /documents/.documents_home/.mozilla
# ... and check that it works,. Also restart Firefox to check if your bookmarks, addons etc. now get picked up from the documents-partition
ls -la
ls -la /documents/.documents_home
Create symlinks for the rest of your settings folders, which you have earlier moved to your "documents"-partition in /documents/.documents_home. Here are a few for inspiration:
cd ~
# do these in one swoop, or they get recreated
mv Desktop Desktop_DELETE && ln -s /documents/.documents_home/Desktop

mv .bashrc .bashrc_OLD
ln -s /documents/.documents_home/.bashrc
ln -s /documents/.documents_home/.bash_aliases
source .bashrc

mv .ssh .ssh_OLD
ln -s /documents/.documents_home/.ssh
For some of these you might have to mv .EXISTING_FOLDER .EXISTING_FOLDER_REMOVE_ME first
cd ~
ln -s /documents/.documents_home/.BR-80_Wave_converter_C310
ln -s /documents/.documents_home/.docker
ln -s /documents/.documents_home/.filezilla
ln -s /documents/.documents_home/.fonts
ln -s /documents/.documents_home/.gitconfig
ln -s /documents/.documents_home/.grsync
ln -s /documents/.documents_home/.thunderbird
Settings in ~.config folder
cd ~/.config
ln -s /documents/.documents_home/.config/asunder
ln -s /documents/.documents_home/.config/autokey
ln -s /documents/.documents_home/.config/chromium
ln -s /documents/.documents_home/.config/qpdfview
ln -s /documents/.documents_home/.config/sublime-text-3
ln -s /documents/.documents_home/.config/transmission
ln -s /documents/.documents_home/.config/vlc
Nvidia graphic card
How to configure a graphic card from Nvidia, most information from https://www.howtogeek.com/242045/HOW-TO-GET-THE-LATEST-NVIDIA-AMD-OR-INTEL-GRAPHICS-DRIVERS-ON-UBUNTU/
Check information
ubuntu-drivers devices
Result
== /sys/devices/pci0000:00/0000:00:01.0/0000:01:00.0 ==
modalias : pci:v000010DEd0000104Asv00001043sd00008496bc03sc00i00
vendor   : NVIDIA Corporation
model    : GF119 [GeForce GT 610]
driver   : nvidia-340 - distro non-free
driver   : nvidia-driver-390 - distro non-free recommended
driver   : nvidia-304 - third-party free
driver   : xserver-xorg-video-nouveau - distro free builtin
Install driver
sudo add-apt-repository ppa:graphics-drivers/ppa
sudo apt-get update
# For GF1xx GPUs use `nvidia-390` (390.87)
# For G8x, G9x and GT2xx GPUs use `nvidia-340` (340.107)
# For NV4x and G7x GPUs use `nvidia-304` (304.137) End-Of-Life!
use nvidia-390
Mirror monitor and TV on startup
If you have connected a TV via HDMI cable, this is how you can connect it as a clone of the monitor.
Find units
xrandr | grep " connected"
Result
DVI-I-1 connected primary 1920x1080+0+0 (normal left inverted right x axis y axis) 608mm x 345mm
HDMI-0 connected 1920x1080+0+0 (normal left inverted right x axis y axis) 160mm x 90mm
Add an item to Startup Applications, to clone screens on start up:
xrandr
xrandr --output HDMI-0 --pos 0x0
Mirror monitor and TV
You can visualize XRandR with the ARandR program.
Start up programs
Add these under Startup Applications:
Audacious
audacious %U
Listen to music
AutoKey
autokey-gtk
Program keyboard shortcuts
Psensor
psensor
Psensor is a graphical temperature monitor for Linux
Occasional Black screen
If you get a message like /dev/sda1: clean, ***/*****files, *****/*****blocks after boot, and nothing else happens, it might happen if you have switched graphic card driver from Nvidia to Nouveau recently.
Solution:
Click ESC during boot
Select Ubuntu with Linux ... (recovery mode)
Select resume normal boot
You should be able to log in and switch back to Nvidia end reboot
Fix downloadhelper coapp issue
wget https://github.com/mi-g/vdhcoapp/releases/download/v1.3.0/net.downloadhelper.coapp-1.3.0-1_amd64.tar.gz
tar xf net.downloadhelper.coapp-1.3.0-1_amd64.tar.gz -C ~/.local/share/
~/.local/share/net.downloadhelper.coapp-1.3.0/bin/net.downloadhelper.coapp-linux-64 install --user
Improve command line
Allow searching for previous commands by typing the start of the command, and press arrow up or down.
Add to ~/.bashrc:
# Bind up/down arrow to history search
bind '"\e[A":history-search-backward'
bind '"\e[B":history-search-forward'

# Settings for history function
export HISTCONTROL=ignoreboth:erasedups
export HISTIGNORE='&:e:c:l:ca:cd:cd -'

# ls aliases
alias la='ls -hal'
alias l='ls -hl'

# better grep
alias grep='grep --color=auto'
alias fgrep='fgrep --color=auto'
alias egrep='egrep --color=auto'

# use better diff alternative icdiff, requires installation of icdiff
alias diff='icdiff'
Make it take effect:
source ~/.bashrc
log errors
[pulseaudio] bluez5-util.c: GetManagedObjects() failed: org.freedesktop.DBus.Error.NoReply: Did not receive a reply. Possible causes include: the remote application did not send a reply, the message bus security policy blocked the reply, the reply timeout expired, or the network connection was broken.
Solution, remove packages via Synaptic package manager:
bluez
bluez-cups
bluez-obexd
gnome-bluetooth
pulseaudio-module-bluetooth
less wait on boot, 10 > 1 second
sudo vi /etc/default/grub
Edit:
# shorter wait
# GRUB_TIMEOUT=10
GRUB_TIMEOUT=1
Update grub
sudo update-grub
disable thumbnails
sudo chmod -R 700 ~/.thumbnails
sudo chmod -R 700 ~/.cache/thumbnails
sudo chmod -R 700 ~/.cache/epiphany/thumbnails
sudo chmod -R 700 ~/.cache/vlc/art/artistalbum
sudo chmod -R 700 ~/.cache/vlc/art/arturl
Firefox
Disable caching under Preferences > History:
x Clear history when Firefox closes
Settings: Select everything, except Cookies
Disable "Ctrl+Tab cycles through tabs in recently used order".
Enable "Search for text when you start typing".
Disable Title Bar for more vertical space under Customize: Uncheck "Title Bar" option bottom left.
Add GNOME Shell Extensions: https://munix.dk/improving-ubuntu-gnome-gnome-shell-extensions
Making screenshots and screencasts
Shutter is a great tool, but Ubuntu has these built in shortcuts for screenshots:
- PrtScn: Screenshot of the desktop
- Alt+PrtScn: Screenshot of a window
- Shift+PrtScn: Select area and take screenshot
The image is saved in your Pictures folder or in your home folder if you do not have a Pictures folder.
Hold down Ctrl as well to only copy the screenshot image to the clipboard instead of saving it.
Make a screencast
You can make a video recording of what is happening on your screen:
- Press Ctrl+Alt+Shift+R to start recording what is on your screen
- A red circle is displayed in the top right corner of the screen when the recording is in progress
- Once you have finished, press Ctrl+Alt+Shift+R again to stop the recording
The video is automatically saved in your Videos folder in your home folder, with a file name that starts with Screencast and includes the date and time it was taken
You can edit start and finish of the resulting video with a program like Handbrake.
https://help.ubuntu.com/stable/ubuntu-help/screen-shot-record.html
Install Vivaldi and Opera
# get Vivaldi, check for latest release at https://vivaldi.com/download/
sudo dpkg --install vivaldi-stable_2.3.1440.61-1_amd64.deb

# get Opera, check for latest version at https://www.opera.com/computer
sudo dpkg --install opera-stable_58.0.3135.107_amd64.deb
Install diagrams.net (formerly draw.io) for wireframing
Check for latest version to find the download path
https://www.diagrams.net/ > https://github.com/jgraph/drawio-desktop/releases/
# download "Latest release"
wget https://github.com/jgraph/drawio-desktop/releases/download/v13.7.9/draw.io-amd64-13.7.9.deb

# see info
sudo dpkg --info draw.io-amd64-13.7.9.deb

# install
sudo dpkg --install draw.io-amd64-13.7.9.deb
Sublime Text
Add a package like Solarized Color Scheme with Package Control:
1. Add Package Control by clicking Tools > Command Palette and selecting Install Package Control
2. Open Preferences > Package Control > Package Control: Install Package
3. Select Solarized Color Scheme
Configure under Preferences > Settings, or via
subl ~/.config/sublime-text-3/Packages/User/Preferences.sublime-settings
{
  "color_scheme": "Packages/Solarized Color Scheme/Solarized (light).sublime-color-scheme",
  "font_size": 16,
  "hot_exit": false,
  "ignored_packages":
  [
    "Vintage"
  ],
  "remember_open_files": false,
  "tab_size": 2,
  "theme": "Default.sublime-theme",
  "translate_tabs_to_spaces": true,
  "trim_trailing_white_space_on_save": true
}
Tip: If you end up with split columns, return to a single column with Shift+Alt+1 see also View > Layout.
Compare and HTML-CSS-JS Prettify
The packages Compare Side-By-Side helps you compare the content of two different tabs and HTML-CSS-JS Prettify re-formats text for easier reading. There is also WordCount and MarkdownPreview.
More font contrast
Install: https://www.sublimetext.com/docs/3/linux_repositories.html#apt
Create this file (Note: spaces and parentheses has to be escaped with \ ("backslash")):
subl ~/.config/sublime-text-3/Packages/User/Solarized\ \(light\).sublime-color-scheme
Put this inside:
{
    "variables":
    {
        "base01":  "hsl(194, 14%, 20%)",
        "base00":  "hsl(196, 13%, 25%)",
        "base1":   "hsl(180, 7%, 40%)",
    }
}
Getting programs to watch later
https://github.com/ytdl-org/youtube-dl#installation
Insert some settings in .config/youtube-dl/config:
# Save videos in this folder
-o /home/your_username/files/%(title)s.%(ext)s
# Download best format available but no better than 480p
-f 'bestvideo[height<=480]+bestaudio/best[height<=480]'
Add gprename shortcut
https://munix.dk/add-gprename-shortcut-activities-search-ubuntu-1804
Merge PDFs and extract text
poppler-utils is included in Ubuntu 18.04 allowing merging of PDFs (pdfunite), extracting all text (pdftotext) and pdftohtml.
Poppler (software)
https://packages.ubuntu.com/bionic/poppler-utils